Step by Step Bring your device to work
This is a step by step instruction to bring a device based on the HomeDing library to work.
- Get a (brand new) EPS8266 board
- Upload the appropriate sketch
- Register the device on the local WiFi network
- Find the new device on the network
- Upload the Web UI files to the onboard file system
- Choose an icon
- See also
Get a (brand new) EPS8266 board
The following steps assume a board of this kind but different boards will not work very different.
The easiest board to start is by using a NodeMCU board with a ESP8266 processor and USB interface. It can just be plugged into an USB port.
See also Boards supported by the HomeDing library
Upload the appropriate sketch
For a NodeMCU board having a ESP8266 chip and 4 MByte of Flash ROM the best sketch to start is the Standard Example that includes a lot of element types and board features.
-
Select the “NodeMCU 1.0 (ESP12-E Module)” board in the Arduino Board Manager and use a memory layout that leaves 2 MByte for the file system by selecting “4M (FS:2M OTA:~1019kB)” in the “Flash Size” option.
-
You probably will have some benefits from the debug output on the Serial port at this point and therefore should activate “Serial” in the “Debug Port” option and “None” in the “Debug Level” option.
-
Select the right COM port and upload the sketch. It should only take about a minute and then reboot the board.
Register the device on the local WiFi network
There is a “hard way” to configure your local WiFi network name and passphrase into the source code in the file “secrets.h”. If you like to follow this approach you can change the file and upload again.
Using the built-in WiFi Manager is the preferred method for connecting to a network and avoids hard-coding network credentials and re-programming your devices when your network changes .
-
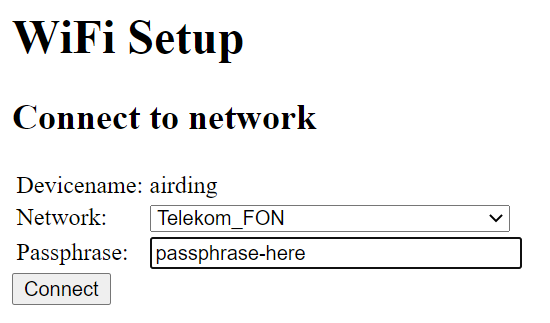
Connect any laptop or mobile phone to the unsecured WiFi network called “HomeDingXXXX”.
Now you have a direct connectivity to this device and can start configuration. Some mobile devices or computer will automatically open the network configuration page.
-
If the WiFi Manager UI is not starting after joining the network please open http://192.168.4.1/ or http://192.168.4.1/$setup manually.
-
The current device name is shown in also this dialog and you will find the device later on the registered network using http://{devicename}.
-
Select your private WiFi Network and enter the passphrase.
-
Press “Connect” to connect.
It may take some time and if everything is fine you will see the HomeDing network disappear and you can re-join your local network.
You may also look into the Serial output using the Serial Monitor of the Arduino Environment to see some messages about what is happening inside the device.
SDK:2.2.2-dev(38a443e)/Core:2.6.3=20603000/lwIP:STABLE-2_1_2_RELEASE/glue:1.2-16-ge23a07e/BearSSL:89454af
00:00:02 sys:i Device starting...
...
00:00:04 sys:t connected.
00:00:04 sys:i airding 192.168.2.118
00:00:04 sys:t Connected to: DEVNET
...
Find the new device on the network
As long as there is no configuration mode requested the device will register itself on the local network using a temporary device name and then start into normal operating mode.
Without any configuration the devicename is constructed by “ESP-” and a device specific hex number given by the digits of the uniques network adapter MAC address.
try:
- http://
- http://{devicename from the Serial Monitor} (should be identical)
- http://
Upload the Web UI files to the onboard file system
There are 3 sources where you can find the files to upload for the web UI.
- The
datafolder in the standard example has a copy of the WebUI files that fits to the set of elements of the standard example and some more. - On homeding.github.io these files are available as well and can be downloaded.
- The
WebFilesproject on https://www.github.com/HomeDing/WebFiles is used to create files for the WebUI.
To transfer the files to the device multiple methods are available:
File Upload Utility
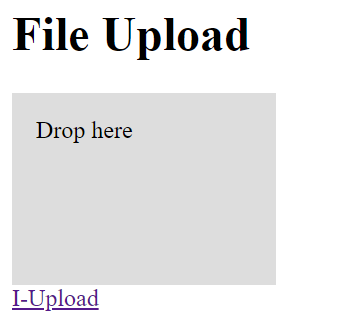
The firmware offers an upload interface as part of the embedded web server. This upload service can be used by the builtin minimal UI available at http://homeding/$upload. This UI is implemented with minimal size (looks plain ugly) but is part of the firmware.
This method is useful when uploading new files or update individual files. Cannot delete files and keeps other files in place.
Upload works by using drag&drop:
- select the files (not folders) in the explorer and drop them over the “drop here” region.
- All files will be uploaded at once.
Web based Update
The firmware offers an update interface as part of the embedded web server. This is available at http://homeding/$update.
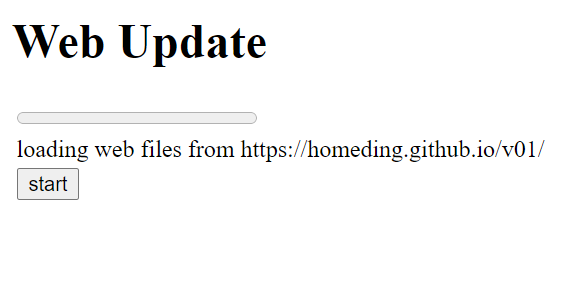
By pressing the start button all files from the homeding documentation website are transferred to the device.
The list of files and files for download are available at: https://homeding.github.io/v09/list.txt.
This method is useful when updating a standard firmware by a new version and the UI files need to be updated or when starting with a new board.
File Upload in IDE
After an initial upload of files the built in Micro IDE can be used. It has a upload area that can be used to upload files into the filesystem like in File Upload Utility.
Only files in the root folder (not /i/*.svg) can be uploaded.
File Save in IDE
The Micro IDE can create new files and can update existing files by entering text and saving it to a (new) filename.
Using Upload tools like cUrl
-
When working with commandline tools the following cURL statement can be used to upload individual files.
curl --form “fileupload=test.txt;filename=/test.txt” http://homeding/
Choose an icon
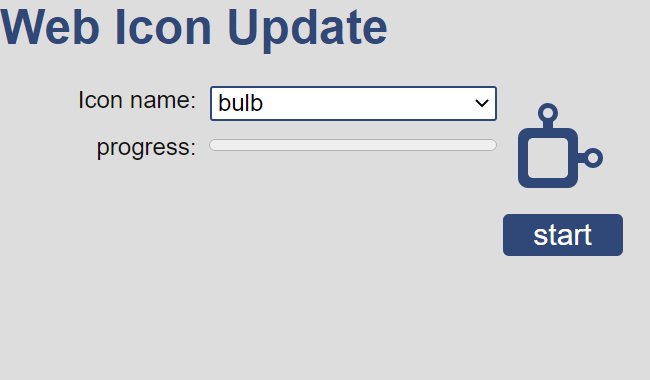
Every device can have a special icon that you will recognize in the shortcut or link.