Elements and Actions
- Building your own connected Things made easy
- Software Architecture
- Elements and Actions
- Builtin Web server
- Device Discovery
The power, flexibility and the extensibility of the HomeDing library comes from 2 main design decisions:
- the unified and standardized implementation of the Elements and
- the way Elements can interact locally and over the network by using messages.
These were influenced by the [W3C Web of Things] standardization, the well-known Actor Interaction Model concepts and the REST full addressing.
Actor Model
The implementation has borrowed some of the ideas and principles of the “Actor Model” that is a complete distributed, concurrent computing model.
The “Actors” and “Messages” in this computation model is similar to the “Elements” and “Actions” in the HomeDing Library implementation. However, the HomeDing Library implementation need to respect the limited CPU and memory power of and the things and the network in between. Some pragmatic design decisions of the implementations have been necessary.
Some good readings about this general interaction model can be found at
- https://en.wikipedia.org/wiki/Actor_model
- http://letitcrash.com/post/20964174345/carl-hewitt-explains-the-essence-of-the-actor
Elements
Like in the Actor Model the functionality is encapsulated inside the components that have a unified interface to the outer world but differ in the inner implementation. This is the concept of the Elements you find in the HomeDing library.
See Elements for the list of available element implementations that can act as senders and receivers of Actions:
- Sensors that can meassure a physical values
- Light Elements that can control color and brightness of light like LEDs
- Audio Elements to can create a sound or play audio
- Displays to show information on displays
All Elements share a common interface to support the life cycle:
- creating new elements - static
create()method, constructor andinit() - configure elements by setting properties -
set()method - startup elements -
start()method - receiving actions -
set()method - executing some Element specific functionality -
loop()method - terminating / stopping elements -
term()method
The functionality of configuring elements by setting properties and receiving actions share the same implementation in the set() method.
The standard interface of every Element is defined by the base Element class. Every other Element is derived from this class and adding the specific functionality.
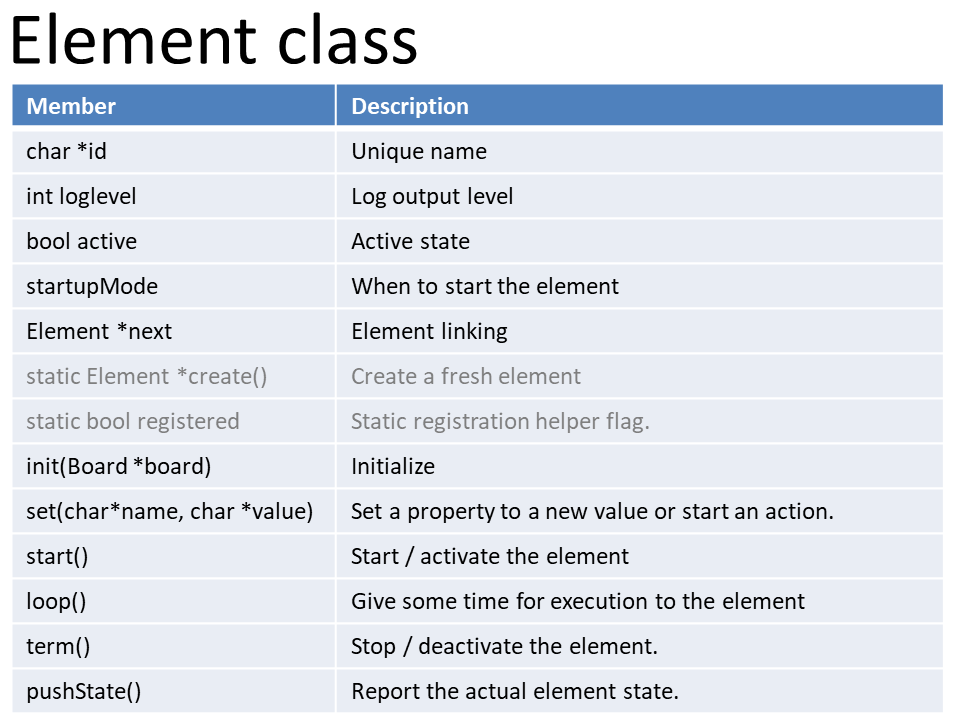
A detailed description of the common Element Interface can be found in ElementInterface.
Configure and Interact with Elements
Every element can be described by its properties, actions and events. They define the API for the specific Element.
Properties
Properties are there to configure the Element to define the behavior of the element.
This is done by using the configuration files that control what elements are created including their specific setup.
Events and Actions
Events
An Event is what happens inside an element like a new sensor value is available or a timing condition has occurred. On this Event one or multiple actions can be created.
Event configurations therefore typically start with a on prefix like the “onValue”
event that occurs when a digital input signal changes the level. Example:
"onValue": "(actions here)"Actions
An Action is the data (key and value) that is passed over to the target element mentioned in the action notation.
The notation for Actions used within the HomeDing library is taken from the URL syntax using
[host:]<type>/<id>?<key>=<value>Examples for Actions
What you can see in the configuration is to setup this interaction by specifying the event on the origin element and the actions that will be sent.
The notation and syntax of Actions is using the well-known URL scheme with server side parameters. It is used internally when Elements in the same device interact but also on the network when devices interact with each other.
Here are some examples:
digitalout/led?value=$vdevice/0?log=level:$v
It is possible to trigger multiple multiple, comma separated actions on the same event:
digitalout/led?value=$v,digitalout/relais?value=$v
It is possible to address a element on a remote device by using the extended syntax:
mypanel:displaytext/temp=$v
Dispatching Actions In The Device
All actions that are triggered by an event or received over the network are not immediately given to the target element but are kept in an internal buffer and an Action Dispatcher and will be delivered one by one.
When an Element is active the loop() function is called periodically so the Element
can so something meaningful.
Some elements will retrieve sensor values, check the state of GPIO pins or will calculate something.
Then they might create actions like displaytext/info?value=22.50 and hand it over to
the action dispatcher in the board class.
This action that will be dispatched to the element displaytext/info and will trigger
the action value with then parameter 22.50.
Inside the board class the action dispatcher is available. Actions are collected in a queue in memory and will be dispatched to the target element shortly after they have been handed over.
Calling the loop() function / executing the element code is prioritized over sending a
message. This is why the board implements a store and forward mechanism with a queue.
The order of the messages is guaranteed to be stable as long as they are not send via network.
Sending Actions by using URLs
By using the notation and syntax of Actions you can use a URL to pass an action into a device manually
e.g. by using http://(devicename)/api/state/digitalOut/D5?value=1.
To send an Action to an element over the network the http GET requests can be created using
- open the url in the browser:
http://(devicename)/$board/displaytext/info?value=22.50 - use a command line tool like:
curl http://(devicename)/$board/displaytext/info?value=22.50 - use the Remote Element in another HomeDing based device.
- use the extended action syntax like
devicename:displaytext/info?value=22.50that will create a Remote Element on the fly.
Chip specific Elements
A device may include special chips that can retrieve some environment parameters like temperature, humidity but also power consumption and voltage level.
These elements are usually asking for new values by implementing the chip specific hardware protocol or read registers using the standard protocols I2C or SPI.
I2C is very common for many sensor chips and is well supported by the Homeding library. Other hardware based protocols are supported by directly or by including specific libraries from the Arduino library collection.
When new sensor values are found the Element will send out a configurable action to inform other elements about it. Displays, Logging and also elements on remote devices are connected this way.
Consuming internet based services
There are services on the internet that offer interesting data or services that can be consumed by calling the external website. These services sometimes require a registration to get an access key but still are called without using an inbound communication and open incoming boards.
In contrast to actions where changes are dispatched using actions to the receiving elements the information must be polled from the service provider on the internet.
The HttpClientElement takes this role and instead of retrieving sensor values it
issues a http-get request to a specific host with a specific url.
Implementing a specific service can now be done using this base class like implementing
the WeatherFeedElement that can retrieve weather from openweathermap.org.
The Lifecycle of the Board and Elements
The implementation of the Board class is the part of the HomeDing Library that organizes all created Elements and dispatches the actions.
Initialization Phase
-
Start the board and make unique facilitating classes like the file service and the web server available by initializing them.
-
Parse the env.json file.
Here the system elements like the Device, the displays and network related elements like ntptime, OTA and SSDP defined.
These elements will be created and the properties will be configured accordingly.
-
Parse the config.json file.
Same with the config.json file. Here the functional elements are configured.
These elements will be created too.
-
Start all Elements
All
systemelements will be started/activated at this time.Now the show can begin.
When a network (other than board manager) is available the ‘network’ elements will be started.
When a local time is defined the
timeelements are started too.
Working Phase
-
Run all Elements and dispatch all actions among them.
The
loop()function of all active Elements is called and when Actions should be passed the board will dispatch them to the right Element.
Restarting and Reconfiguration
When a configuration change is required the configuration file in the SPIFFS needs to be updated.
The new configuration will not be effective immediately but only by restarting the whole thing.
However, it is possible to change properties of the current active Elements be using the REST methods of the web server. These changes will be effective immediately but are not saved to the configuration file.
Compile time vs runtime configuration
The standard board already includes a lot of Elements when being compiled. Therefore, it is possible to use them in a configuration without recompiling the program itself.
Other Elements require a specific library. These Elements must be activated in the sketch and the sketch will only compile properly when you have installed the required library in the Arduino Environment.
Examples are DHT Element, RFCodes Element or DCFTime Element.
As the ESP8266 chips offer a lot of program memory this approach works fine when boards have a 4MByte Flash memory. The Standard Example includes the most common elements of the library and can be used to flash many boards and hardware setups.
For compiling to different memory setups, like the ESP-01 board it is possible to compile with a reduced set of elements so to make the program fit into memory. See example minimal footprint example.
Be aware that the number of configured elements is also a limiting factor because every Element not only needs program space but also memory for the classes and variables.
Addressing Elements, properties and actions
When technically addressing an active element, an element property or sending an action to an element the same 2-level syntax and parameters of addressing is used as it is known from the URL syntax.
The usual notation is using lowercase characters only. The comparison is internally case-insensitive by comparing always the lowercase variants.
Examples are:
digitalout/relay?value=1display/d3?show=1
The first level is the type of the element. The first level is the local id of the element (you can have a button and a output element with the same name)
The parameter is appended by using ? as a separator and a parameter value can be specified using = when required.
This schema can be found in many places:
- The config.json is structured this way but using JSON objects
- When using the REST services in the web server the URLs look the same, including the protocol and hostname
- When specifying properties and events
The messages passed around are quite simple and reuse the addressing notation for elements and properties. This also allows sending them across a network easily.
The board class implements a queuing mechanism that can quickly receive some new messages and will emitted them to the mentioned elements one by one.