Build a Weather forecast display
This is Work in progress
Table of Contents
- Intro
- Use the browser as a remote information panel
- Supplies
- Prepare Arduino Environment for ESP8266
- Install the HomeDing Library
- Customize the standard example sketch
- Allow network access
- Web based Upload of the web UI Files
- Create the system and display configuration
- Register at openweathermap ???
- Create the configuration for a weather display
- Links and references
Intro
The weather of today is a fact, just look outside or use some sensors. The weather of tomorrow is relevant for planning.
This is about a device that shows the weather forecast on a display and also allows automation of other devices based on weather forecast information.
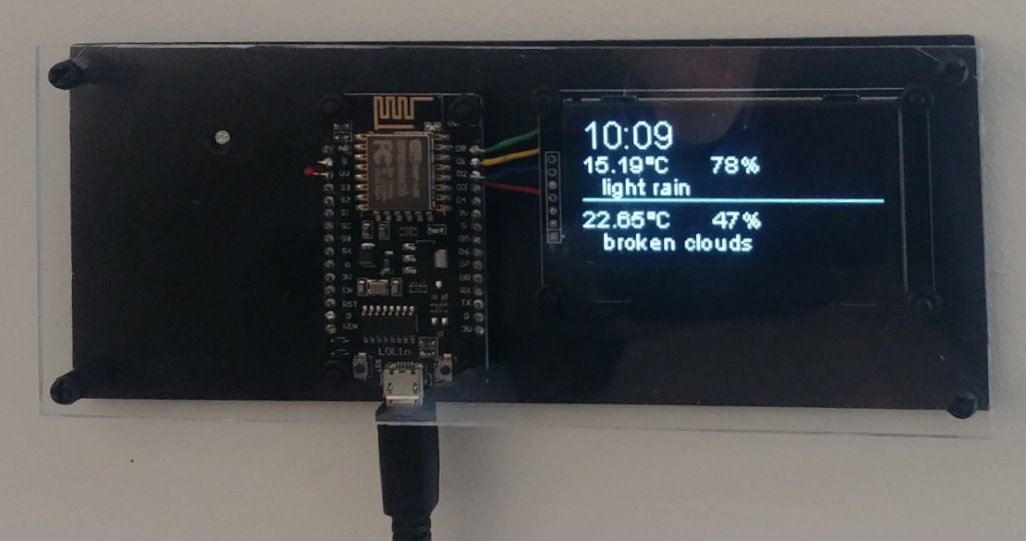
This solution here uses a ESP8266 board and a OLED display. This Material that you can get under 7€.
The software is based on the HomeDing library for IoT devices and the OpenWeather forecast service. The library also supports looking into the display of the device remotely using a web browser.
The ESP8266 board used here is a combination of a ESP8266 with 4 MByte Flash ram and a 128*32 pixel display.
- The actual temperature and humidity is taken from a DHT22 sensor attached to the device.
- The forecast information is coming from the OpenWeather service. The free version (only registration) is sufficient.
- There is the option to use a remote sensor that can be placed e.g. outside using another ESP8266 board.
- There is also the option use different displays or sensors as the library is very flexible in using different displays with different chips or different sensors like the BME680 including air pressure.
By using the HomeDing library it is easy to build a device that is connected to your home Network only and can be reached and controlled by any browser on the network. It comes with a selection of Elements that allow using the most common sensor chips, devices and other services.
It also brings a complete solution for hosting a web side inside device instead of using a cloud based solution to display the sensor data and interact with the device.
Use the browser as a remote information panel
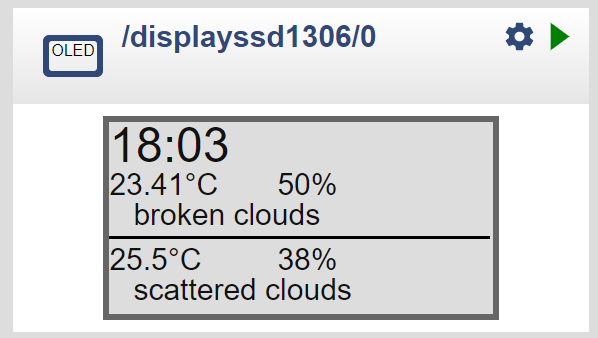
The display content is also available when using a browser and open the Web UI of the device.
The Homeding library provides a web version when opening the http://
Supplies
The hardware parts you need to build this project and used in this story are:
- A nodemcu or compatible board with the ESP8266 processor and USB interface.
- A OLED display based on a SH1106, SSD1306 or SSD1309 controller chip.
- 1 USB plug and a micro-usb cable for power supply.
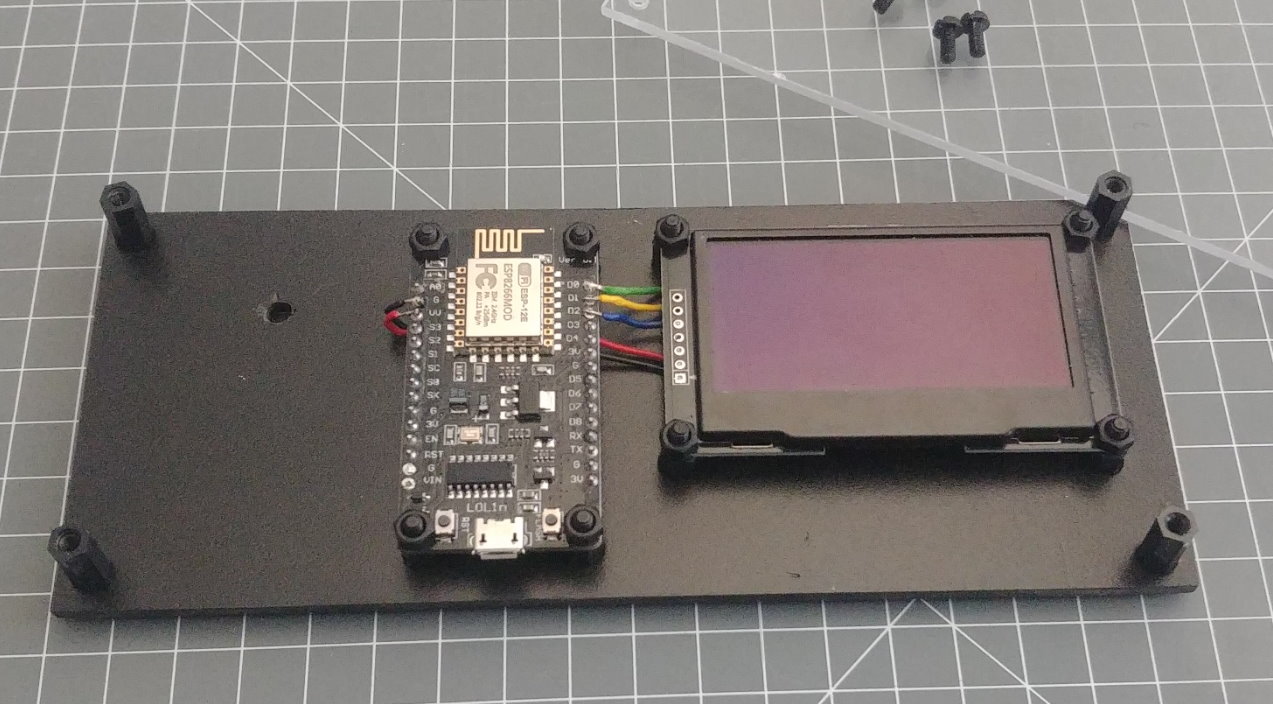
There are boards available that already have both combined like
The system configuration for these boards can be found on these pages. Here a nodemcu and a discrete display is used.
Prepare Arduino Environment for ESP8266
-
To install latest version of Arduino IDE (currently version 1.8.12) please visit https://www.arduino.cc/.
-
Download the Arduino IDE for your operating system from the
Software -> Downloadmenu. -
Install the Arduino software and all drivers.
-
Start the Arduino IDE and open the Preferences dialog.
-
Enter
https://arduino.esp8266.com/stable/package_esp8266com_index.jsoninto theAdditional Board Manager URLsfield. You can add multiple URLs, separating them with commas. -
Open the menu Boards Manager in the Arduino IDE from the Tools -> Board menu and find entry esp8266 by ESP8266 Community and install the latest version.
-
Use the Board Manager to install the ESP8266 support.
A detailed instruction can be found here: https://arduino-esp8266.readthedocs.io/en/latest/installing.html#boards-manager
-
Setup the board options for a NodeMCU 1.0 with 1MByte reserved memory for the File System
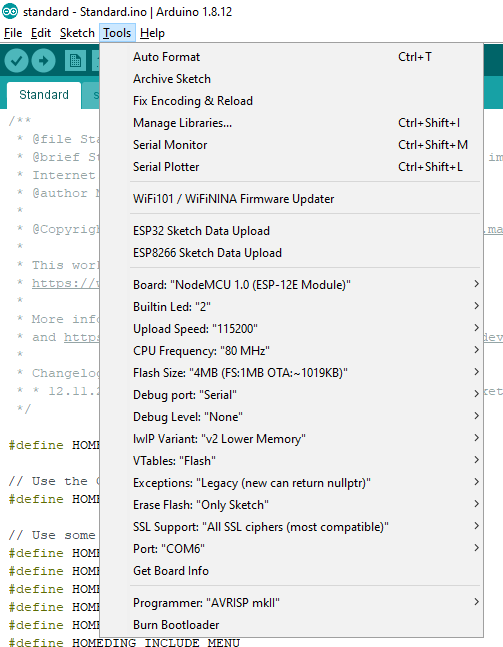
Now you are ready to build Arduino projects, edit sketches and upload them to the device.
Install the HomeDing Library
Open the Library Manager in Arduino Environment and search for the HomeDing library and install it.
The HomeDing library relies on some common extra libraries for sensors and displays to work. These libraries will be installed automatically as dependencies.
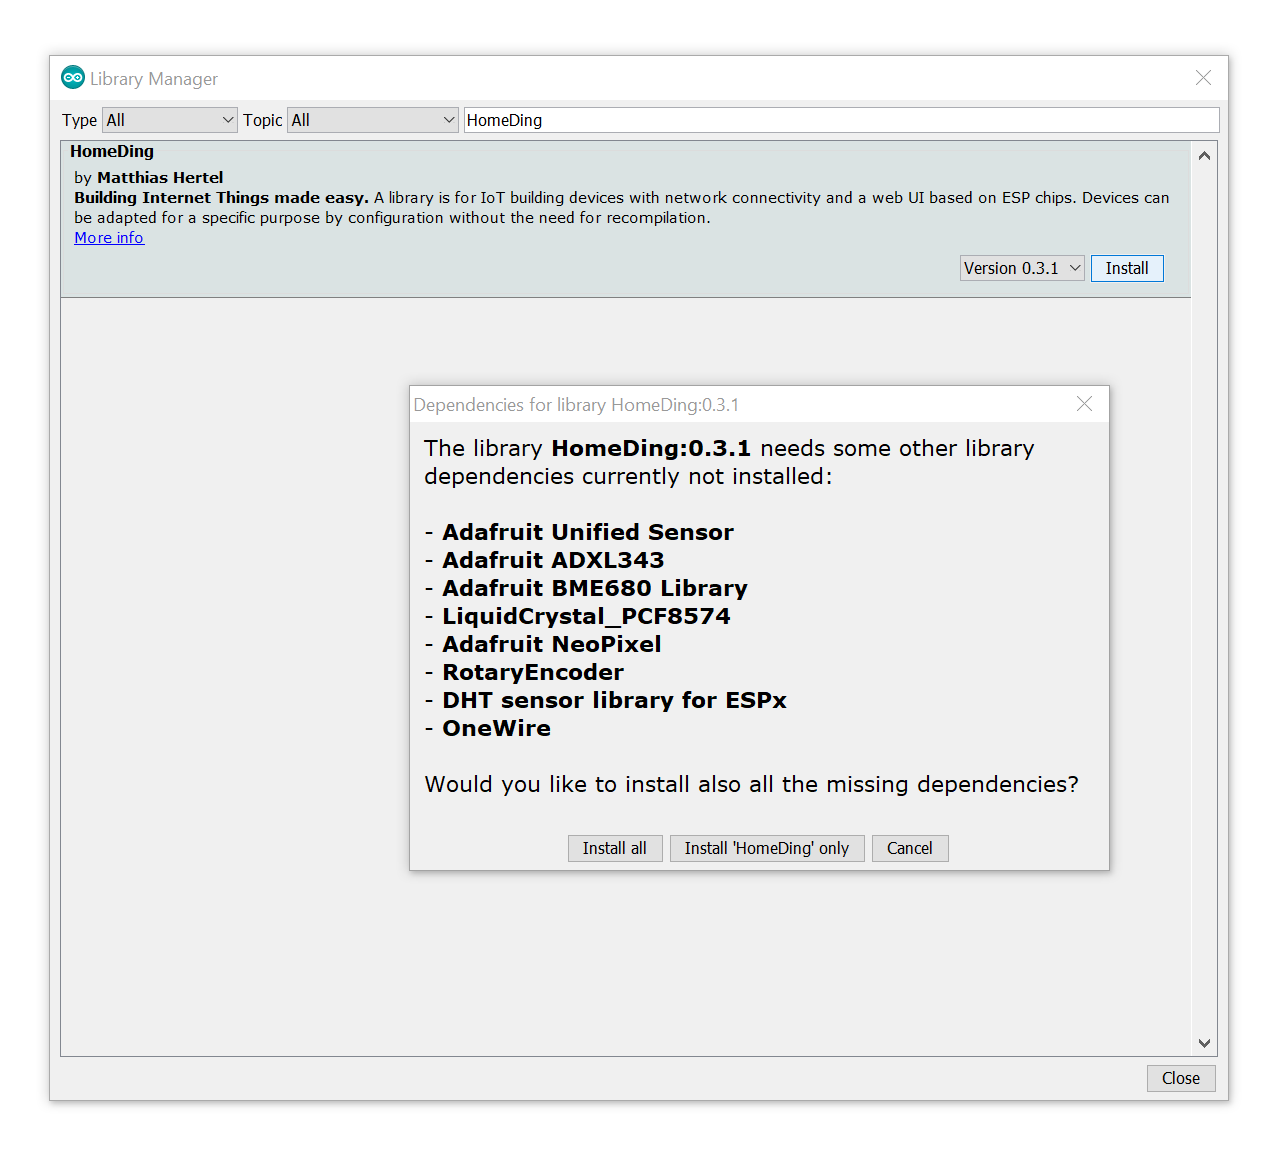
Now the library implementation and the examples are available to be used.
Customize the standard example sketch
The Standard Example already includes the most common elements for sensors, services, general IO and displays so only some configuration will be required.
This implementation also required the special WeatherFeed Element for accessing the WeatherFeed service. Therefore the standard example needs to be extended to include this element in the firmware by defining the following constant in the standard.ino sketch file just above the #include <Arduino.h>:
...
#define HOMEDING_INCLUDE_WEATHERFEED

#include <Arduino.h>
...
Allow network access
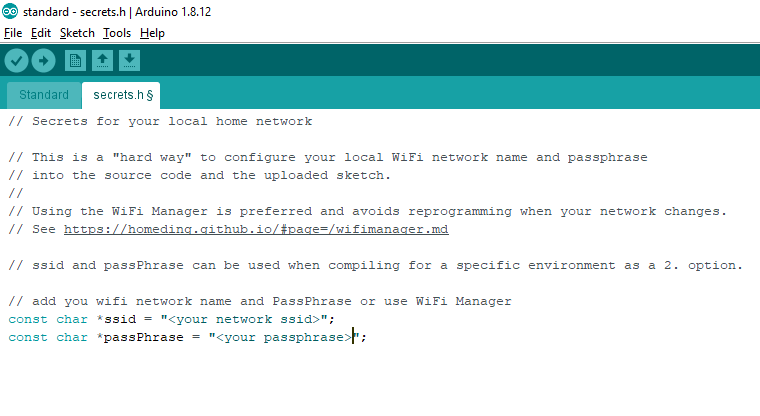
For simplicity on adding the new device to your home wifi network you may add the SSID and passphrase of your home WiFi
in the secrets.h file next to the standard.ino sketch file. But you can also use the built-in WiFi Manager to add
the device to the network without this hard-coded configuration.

If you like to configure the network credentials using the built-in wifi manager you can find a step-by-step description at Step by Step Bring your device to work .
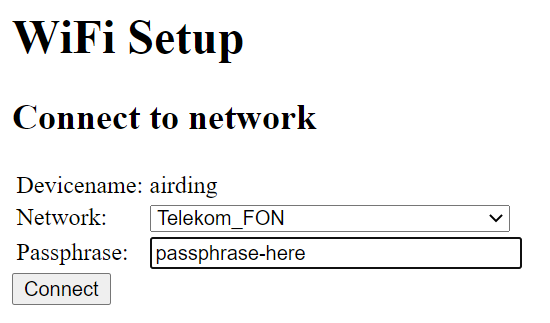
Now everything regarding implementation of the sketch is done and the firmware can be compiled and uploaded.
Web based Upload of the web UI Files
The standard example comes with a data folder that contains all file for the web UI. These files are also available
in the HomeDing documentation web site and can be transferred by opening the page /$boot.htm. Use
http://<devicename>/$boot.htm and use the devicename or ip address of your board.
??? devicename example of a fresh device.
The press start and you see the UI files transferred from the web site to the device.
This method is useful when starting with a new board or to update to a new version of the UI files.
Create the system and display configuration
The device hardware specific configuration of the board and the display should be placed into the /env.json file. The I2C bus configuration must also be done in this file in the device configuration. Here is a full configuration version for a standard nodemcu board with a SSD1306 / SSD1309 based display:
{
  "device": {
    "main": {
      "name": "nodeding",
      "description": "nodeMCU board config",
      "reboottime": "24h",
      "button": "D3",
      "led": "D4",
      "I2C-SDA": "D2",
      "I2C-SCL": "D1",
      "safemode": "false",
      "loglevel": "2",
      "cache": "max-age=600"
    }
  },

  "DisplaySSD1306": {
    "0": {
      "address": "60",
      "height": 64
    }
  },

  "ota": {
    "main": {
      "description": "allow Over the Air Updates"
    }
  },
  "ssdp": {
    "0": {}
  }
}
Register at openweathermap ???
Create the configuration for a weather display
The display is used to show some values from the forecast so we need to configure the service parameters, some text output and where to find the information to be displayed in the result from the service.
The following configuration can be used:
{
  "weatherfeed": {
    "home": {
      "host": "api.openweathermap.org",
      "get": "/data/2.5/onecall?units=metric&${loc}&exclude=current,hourly&appid=${key}&lang=en",
      "key": "<your key here...>",
      "loc": "lat=50.23&lon=8.65",
      "readtime": "04:00:00",
      "actions": [
        {
          "path": "daily[0]/temp/day",
          "onvalue": "displaytext/t0?value=$v"
        },
        {
          "path": "daily[0]/humidity",
          "onvalue": "displaytext/h0?value=$v"
        },
        {
          "path": "daily[0]/weather[0]/description",
          "onvalue": "displaytext/d0?value=$v"
        },
        {
          "path": "daily[1]/temp/day",
          "onvalue": "displaytext/t1?value=$v"
        },
        {
          "path": "daily[1]/humidity",
          "onvalue": "displaytext/h1?value=$v"
        },
        {
          "path": "daily[1]/weather[0]/description",
          "onvalue": "displaytext/d1?value=$v"
        }
      ]
    }
  },
  "displaytext": {
    "t0": {
      "x": 55,
      "y": 16,
      "fontsize": 10,
      "value": "--.--",
      "postfix": "°C ",
      "description": "Display the temp forecast"
    },
    "h0": {
      "x": 100,
      "y": 16,
      "fontsize": 10,
      "postfix": "%",
      "value": "--",
      "description": "Display the hum forecast"
    },
    "d0": {
      "x": 8,
      "y": 26,
      "fontsize": 10,
      "value": "txt",
      "description": "Display the forecast description"
    },
    "t1": {
      "x": 55,
      "y": 41,
      "fontsize": 10,
      "value": "##.##",
      "postfix": "°C ",
      "description": "Display the temp forecast"
    },
    "h1": {
      "x": 100,
      "y": 41,
      "fontsize": 10,
      "postfix": "%",
      "value": "##.##",
      "description": "Display the hum forecast"
    },
    "d1": {
      "x": 8,
      "y": 51,
      "fontsize": 10,
      "value": "txt",
      "description": "Display the forecast description"
    }
  }
}
The weatherfeed element is configured to call the given url by using the location and key parameter. As a key you need to use your personal key as described in the openweathermap.org documentation. Here also the information mapping is configured.
The values themselves will be “pushed” by the the weatherfeed element to the displaytext elements using actions.
The displayText elements are used to display the information given by the actions from the weatherfeed element.
Links and references
- HomeDing Source Code Repository: https://github.com/HomeDing/HomeDing
- HomeDing Documentation: https://homeding.github.io/
- Standard Example
- The DHT Element
- WeatherFeed Element
- PMS Element
- Log Element
- NPTTime Element
- Display
- DisplayText